This is an exciting time for home theater and one for which I have been waiting; the ability to properly display CinemaScope content in its native aspect ratio, duplicating the experience of your local film theater where CinemaScope content is larger, growing left to right as the side curtains are pulled back to reveal more screen for a larger image. Check the A/V and videophile magazines for this year. Odds are quite high that they had advertising for cinemascope screens, lenses or compatible projectors. A new term has appeared in front projection reviews and specs called "Panamorph lens compatible/capable", which was also supported by the BenQ projector I reviewed. Welcome to the new buzz words for home theater enthusiasts, specialty retailers and installers: CinemaScope, CineWide and Scope. What is rarely discussed, if ever, in these same magazines is another method for achieving the same outcome; using the existing zoom of a front projector along with the videophile and purist benefits this can provide over the Panamorph lens approach. At the beginning of 2007, fellow HDTV Magazine author and colleague Rodolfo La Maestra wrote a series of articles on CinemaScope HD Home Theater, detailing the approach of using an anamorphic lens that stretches the image left to right while a scaler stretches it top to bottom so 2.35 content fills out the screen. Today a number of manufacturers are releasing compatible projectors and lenses with Runco having led the way with the first turnkey CinemaScope home theater system displayed at CES in January 2003. All of these add thousands of dollars and additional installation effort. With the right projector and setup you can do this now for a lot less using the zoom approach providing potentially better imaging science results for less than $1000 by replacing your 1.78 (16:9) screen with a 2.35 screen. 
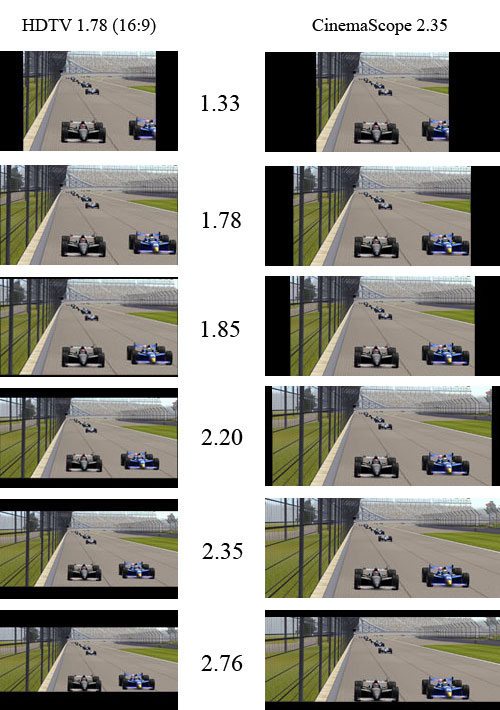
Aspect Ratios and Constant Height Presentation OAR2.jpg For the most part movie content is provided in 1.78, 1.85 and 2.35 aspect ratios, but there are many exceptions, some well known such as Ben Hur in 2.76 or Grand Prix and Lawrence of Arabia in 2.20. Using a screen shot from my gaming PC, I edited the image size for 1.33 (4:3), 1.78 (16:9), 1.85, 2.20, 2.35 and 2.76. The first group shows how those same aspects are displayed on a native HDTV 1.78 screen with 0% over scan. The second group shows how all those aspects appear using the zoom of your front projector to maintain constant height within a native 2.35 screen. Note with 2.76 you finally have black bars top and bottom as well, yet with the zoom approach you retain the ability to crop the sides and maintain constant height if desired. Being the original aspect ratio (OAR) purist that I am, I would live with the bars. Both image groups use the exact same vertical height and the only difference is the width (except for 2.76). I did not provide a set of images for anamorphic 2.35 since most buyers of such a system are likely to use aspect settings that will fill out the screen with all content. If OAR is a concern, the anamorphic 2.35 system does support native 4:3 and 16:9 aspect ratios with side bars. Anamorphic 2.35 Pros and Cons
  • There are various recipes depending on your application and desired level of quality. These range from $2,200 to $23,000, not including the projector
  • If you hate black bars they can be removed most of the time but may reappear depending on your source (such as 4:3 commercials during an HDTV program). What ever primary content you are watching your screen can nearly always be filled out; there are exceptions.
  • Fully automated for the market that prefers simplicity at the touch of a button.
  • It is not artifact-free for videophiles seeking the best performance. Nonetheless, most viewers are perfectly satisfied, if not blown away, by the CinemaScope experience
  • A 2.35 source setup for your 2.35 screen will remove on screen graphics from your system that appear in the black bars above or below. This can include sub-titles.
The anamorphic system presents artifact-inducing concerns starting with an additional piece of glass, the anamorphic lens. Glass is not 100% efficient creating small losses in light output and reducing intra-field contrast ratios. Such lenses can also suffer from chromatic errors which cause a separation of the red, green and blue primaries appearing as convergence errors on screen, poor focus uniformity and pin cushioning errors. These errors will be directly related to the quality of manufacturing which is why they can be so expensive. Some lenses require a special curved screen while some use the far more common flat screen. In most cases greater attention to precision projector mounting is required, as well as an additional mount and potential precision alignment for the anamorphic lens assembly and additional wiring for automation. To remove the top and bottom black bars and also apply all pixels and light output to the full 2.35 screen requires a scaler to electronically stretch the 2.35 image top and bottom so it fills out the screen vertically while the anamorphic lens mechanically stretches it left to right. This approach was born from anamorphic film projection applied to digital projection along with the past use of 1280x720 front projectors. With 720p this was clearly required due to pixel visibility. Viewing distance is everything for passionate Cinemascope enthusiasts and most 720p projectors could barely slip by a 3 screen heights viewing position, the height of your viewing screen times 3. Zooming a 720p projector for 2.35 content will only make the pixels and the spaces between them larger and more visible from the same viewing position. Another huge benefit for 720p is the ability to use all the pixels for scaling. The black bars of a 2.35 source prevents about 33% of the pixels from being in play reducing vertical resolution to about 482 pixels or lines for 720p so being able to recover them is clearly a good thing for scaling along with the side benefit of retaining light output for the losses that must occur when increasing screen size. Scaling is far from perfect though when converting one pixel response to another, especially when you don't have enough pixels to work with. Scaling an SD DVD to 720p or scaling 1080i/p to 720p without any artifacts is quite challenging if not impossible for an FPD, fixed pixel display. Only projection CRT has the ability to morph to another scan rate without artifacts or scaling as well as providing a variable range of line or pixel counts in between. In the end the anamorphic system will create a number of artifacts related to scaling and optical performance along with rectangular pixels in performing this operation for all of our current FPD consumer projection displays. Anytime you add one or more processes you will create artifacts, yet for 720p projectors and 2.35 screens the benefits clearly outweighed the losses! While the anamorphic CinemaScope lens/scaler approach is a benefit for 720p that same process can only upset the all important 1:1 pixel mapping desired for 1080p sources such as Blu-ray with a 1080p display providing a tic tac sharp detailed response in the vertical plane. The scaling process has no choice but to upset the horizontal 1:1 pixel mapping as well now that the pixels are rectangular. Bear in mind that in this application whatever aspect ratio is being presented by the HD disc the source is already 1:1 pixel mapped to 1080p and therefore to your 1080p display for a pixel perfect artifact-free response. While using all the pixels helps with light output, the use of lamp power settings with the right screen size and gain can help with a manual iris easily offsetting that problem. Transferring anamorphic 720p imaging science theory and benefits to 1080p displays is a disservice to imaging science and artifact-free images, yet you will find the manufacturers espousing that same theory to justify the additional hardware and expense for 1080p. The anamorphic system is based on three aspect ratios, 4:3 (1.33), 16:9 (1.78) and 2.35, along with a variety of aspect control features related to filling out the 2.35 screen and getting rid of black bars, something most customers prefer regardless of how it changes the original presentation. In all cases the image is either being geometrically warped in some areas like the outside edges and/or cropped to make this happen. Regardless, consumers and retailers alike have nothing but praise for the ability to fill out a 2.35 screen with all content getting black bars off of the screen! The greatest benefit of all for the home theater market is it works quite well, can be turn key and, more importantly, automated! This means the feature for the mass market can be made easily accessible using a programmable HT remote. No fiddling or adjustment of anything. Push the proper buttons for what you want on your screen. Zoom 2.35 Pros and Cons
  • You need a projector, 1080p preferred, that meets the minimum requirements which many will. Minimum 1.3x zoom along with lens shift or vertical centering
  • A manual iris adjustment is the best route for light output compensation
  • You will need a dark border above and below the screen or you may be able to make out the black bars of 2.35 from the 1.78 source that are now over scanning your 2.35 screen in this mode
  • No additional lens optical errors or mounting concerns
  • With a 1080p projector you maintain 1:1 pixel mapping of 1080p sources for a straight shot to your display eliminating any artifacts induced by scaling
  • Provides an infinite range from 1.33 to 2.35 supporting OAR for nearly all content
  • No cropping of the image or geometric distortion yet as with all OAR systems your screen may not be filled out either, black side bars
  • Hands on manual operation in nearly all cases; just recently two manufacturers have provided automated settings for full automation
  • A 2.35 source setup for your 2.35 screen will have on screen graphics from your system that appear in the black bars above and below your 2.35 screen instead and this can include sub-titles
  • Unlike the anamorphic approach you will be able to see subtitles appear below your screen for better or worse so black masking material or black paint above and below the screen is recommended
Light output is the main area of debate for this application. You are making the image 33% larger so light output will drop by about 33%. A 33% drop in light output though is far less dramatic than one might think and does not create a radical change in your image; it is dimmer and duller but by a small margin perceptually. The key here is to not under drive your screen to begin with. A new lamp should be providing way more light output then you really need so as it ages you won't be tempted to change it prematurely because your image has become noticeably dim. Most designs are based around a 15 Foot-Lambert (FL) minimum light output from the screen and a proper design would be creating 30FL or more with a new lamp. Using this example a 2.35 zoom would drop the light output to 20FL, still acceptable. If your projector has a lamp power feature and you are getting your 30FL in the low mode then you can get another 10-15% more light output by going to high power mode. Using the example of 20FL in 2.35 mode you could get another 2-3FL on the screen by using this feature and while not much it visibly helps. What you would not want is a setup on the edge, say 18FL, which in 2.35 mode drops it to 12FL and a dim image. Bear in mind lamp power settings also affect fan noise with high power settings naturally being louder. The best solution overall is a manual iris. As an example with my BenQ W10000 I have a range of 27FL with the iris wide open to 4.5FL with it fully closed providing more than enough range to compensate. In fact so much range that it would create insignificant errors in intra-field contrast ratios by using it since the difference between both modes requires a small adjustment reflecting about a 20% change in the available range I have with the BenQ. Another great point is with a light meter you can take your light output reading at the 16:9 setting, switch to 2.35 and adjust the iris for the same amount of light! Just in case you think the BenQ is your 2.35 zoom answer it doesn't qualify for this application as it does not have enough zoom range requiring you physically move the projector farther away to fill out your 2.35 screen. Pixel visibility and viewing distance can be the Achilles heel of this method. When you zoom out to 2.35 the pixels will become larger and although your vertical size and viewing position did not change, the projected screen size did. In my application I use a 128" 2.35 screen at about 2.8 screen heights or 140" viewing distance. For 1.78/16:9 and 4:3 content the projected 16:9 screen size is 102". When zooming to fill out my 2.35 screen the projected 16:9 screen size becomes 136" overscanning the top and bottom of the viewing screen but that also changes my viewing distance to two 16:9 screen heights. To maintain the same level of pixel visibility I would need to increase my viewing distance to 187" which would also defeat the purpose of experiencing a larger image. All I get then is a different screen shape exchanging a reduction in vertical size for an increase in horizontal size. At my viewing distance with a 720p projector, pixel visibility performance takes a huge hit with zoom 2.35 and this is where the anamorphic method has the cure and advantage yet that is directly related to the viewing distance. Simply increasing my viewing distance to 4 screen heights or 200" would resolve that problem and also happens to be within the typical 4-6 screen heights I see in customer homes. Using the zoom 2.35 method with 720p product at these long viewing distance applications works just fine! There is another solution though for those who like to sit close, smaller pixels and better fill factor in the form of 1080p. Indeed, with a 1080p projector pixel visibility is impossible at 1.78 and at 2.35 they become just barely perceptible if you have perfect vision, just like my 720p projector at 1.78. Going to a 3.2 screen height distance for 2.35 with a 1080p projector makes them disappear altogether. This typically can't be automated with a few buttons on your remote. It is a manual process that may require handling the projector's zoom lens, focus and shift adjustment like the Samsung SP-H710AE which will also require rock solid mounting. Using the Panasonic PT-AE1000U with motorized zoom/focus and vertical centering in place of shift allows you to perform the adjustments without ever touching the projector by using your remote instead making 2.35 zoom a breeze. One potential topic of debate using the zoom lens deals with increasing optical artifacts. The accepted practice is to use minimum zoom when possible. This produces the smallest image passing through the lens using as little of the lens surface area as possible to minimize optical artifacts from using the edges while providing the best intra-field contrast ratio. The con for this mode is it also minimizes potential light output because optics are not 100% efficient. When you zoom you make the image passing through the optics larger. Since more optical area of the lens is being used you get greater efficiency and an increase in light output but now your image is using more of the lens edge and that can create chromatic errors, separation of red, green, blue and linearity, lines start curving, and focus uniformity, center to edge focus, is not equal or in the same plane. While you are getting more light through the lens by using more surface area that is also more area to create refractions; the light that didn't pass through the lens that gets reflected back into the optics reducing intra-field contrast ratio, the difference in level between black and white that occurs when refracted light from bright areas ends up in the dark areas of the image washing them out reducing the dynamic range. The argument here is that by using the zoom for 2.35 you have introduced optical artifacts that otherwise would not be there. True, but let's put this in perspective. The requirement is a 1.3x zoom range and that amount adds to up to a small hill of beans. Projectors with 2.0x zoom range can show significant differences in artifacts and light output yet for this application the required 1.3x adds only marginal errors. Regardless of which method you use for 2.35 CinemaScope you will have to change optical properties via some method. The anamorphic lens is going to suffer from uncontrolled refractions, light being reflected not only back into the projector lens but also reflecting off the lens housing and projector housing back into the anamorphic lens reducing the intra-field contrast ratio of both the anamorphic lens and projector lens. It could be argued that refractions from the zoom method stand a better chance of yielding a higher intra-field contrast ratio because this has been taken into account in its design from optical coatings to lens chamber design. One thing is for sure; the anamorphic lens adds yet another optical element to the system but unlike the lens assembly that came with your projector, it is optional. This is a controversial article. Imaging professionals like myself have stated their dissatisfaction with the anamorphic approach in conversation especially now with 1080p projectors on the market. Many have themselves chosen the zoom approach over anamorphic for their own systems while supporting the turn key anamorphic approach for their clients. I have not put forth a ton of effort to prove some areas of the zoom approach and there are other areas that would show marginal differences or be difficult to measure properly. There is also the future which could make an automated turn key zoom approach viable or improve the performance of anamorphic. The arguments for and against either approach are easier to prove with equipment and imaging science than perceived with the naked eye. We have hands on videophiles here and performance is an attribute we hold in high regard along with the ability to explain why. I am providing some imaging science data to support both the approach of zoom and the possible advantages over anamorphic for the hands on performance enthusiast and front projection manufacturer. In the end let your pocket book, home theater vision, operational convenience and performance level lead you as it may. Zoom Approach Gets Direct Support Panasonic has released its first commercially available plug and play zoom anamorphic projector, PT-AE3000, finally providing a hands off solution for the zoom approach. From our CEDIA 2008 press release:
Many movies come in aspects that are even wider than the projector's 16:9 aspect ratio to match the image size 21:9 seen at movie theaters. More and more projector customers are using the 21:9 wide screens to mirror the movie theater experience. The PT-AE3000 enables users to pre-set three different zoom/focus positions and enables easy recall of those positions with the Lens Memory Load function.
A new high end home theater company came to market this year called Wolf Cinema offering a feature they call Veriscope. From an exchange between publisher Gary Reber and Jim Burns of Wolf Cinema titled Wolf Cinema's Jim Burns, Widescreen Review, Issue 134, September 2008:
Burns: ... We perform this operation with our precision optics, not scaling. Every aspect ratio can have a separate memory in the projector. The optics are automatically adjusted with motors ... . WSR Reber: You're saying you don't need an anamorphic lens? Burns: We don't need an anamorphic lens. With the anamorphic lens, we do keep more pixels, and we like more pixels. WSR Reber: So you offer an anamorphic lens? Burns: We offer it with anamorphic lens but Veriscope also works without one and there's a cost savings for that, and amazingly, if the person is super sensitive to contrast ratio, the contrast ratio is better without the 2.35 lens.
Pulling it Altogether Sales engineer for Runco, John Bishop, writing an article for Widescreen Review, Scope Format Cinema For the Home - Part III, remarked that the most common of client requests is "make it as big as you can and get rid of those stupid black bars!" The anamorphic approach was driven by 720p projection and 2.35 OAR, original aspect ratio, enthusiasts for the most part over the last number of years and with the 1280x720 pixel matrix one can easily say required. 1080p changes all of that. You can bypass the anamorphic approach altogether and get great if not better imaging results by maintaining source signal integrity, 1:1 pixel mapping and original aspect ratios for the hands on videophile purist and OAR enthusiast. While Panasonic and Wolf Cinema have finally come to market with automated turn key native 2.35 zoom projectors they are but 2 of dozens of other projectors that do not. The market is not purist driven and even rarer, hands on, so the anamorphic method currently remains the most common mass market approach to achieve an automated turn key native 2.35 system. OAR enthusiasts are unfortunately rare and another desire of the mass market that cannot be denied is filling out that screen and getting rid of black bars regardless of its shape or that of the source; just get 'er filled! No doubt the Cinemascope 2.35 screen yields a more exciting presentation regardless of your stance on OAR as it fits better into our human world where size and expanse for the most part is perceived horizontally rather than vertically.